Menu
Log in


kentucky State beekeepers association


Log in

Phil's Observations and Advice

Here, Phil Craft hosts a conversation with beekeepers where he discusses beekeeping, honey bees and answers questions from beekeepers. Phil also provides observations and helpful tips gained from years of keeping bees and being the Kentucky State Apiarist. You may send  questions to Phil  Craft's email . Phil will respond personally to all questions. If he posts a question & answer from you here, your name will not be used. But please sign your name when emailing your questions to Phil. Indicate where you keep bees or where you reside (community or county) and tell Phil a little about yourself and your bees. Letting Phil know your background will help him better answer your questions.
  • Thu, June 15, 2023 3:49 PM | Phillip Craft (Administrator)

    In February I wrote about my “First look of the new year into my hives” (February 13, 2023 post), about a first of the year check of my colonies that I had performed a couple of days earlier. On that visit, which is typical of my first early looks into my hives of the year, I did not remove any frames. I merely observed the honey bee cluster between the frames, after removing the lids. That gave me all the information that I needed at the time – this told me that the bees in the colony had survived the winter, and the size (number of bees) of the hive’s cluster. An early indication of colony strength. Then in March, after a period of warm spring like weather, I wrote another post concerning my first complete inspection of my colonies - “What I look for on the frames when checking my hive“ (March 6, 2023 post).

    During this check I removed and observed all the brood frames in my colonies to take a closer look about how each was faring. This spring check in March – which was the start of an early spring here in Kentucky, was my first serious hive inspection of the hives in my apiary. This thorough spring hive inspection is typically the only complete check I do of my hives in the spring – meaning a check where I look at every frame in all the hives in my beeyard. After this first inspection I do spot checks to tell me that all still looks well. The purpose of the detailed early spring check, done in March or April depending on in hives when spring arrives, is to conform that:

    •  My queen is present in each hive, that she is a “laying queen”, busy laying eggs. In the first early spring check I am content to see a couple of frames with eggs & developing larvae, and some mature, capped brood. 

    This queen/egg & larvae check also tells me that my colonies are busy rearing brood. Remember: The queen’s task is to lay the eggs in the colony, the nurse bees feed the larvae, and as the larvae ages, they cap the brood cells. This is sometimes called separation of reproduction, where the queen lays the eggs, and the workers care for the colony’s offspring. And I say that colonies in the spring are all about growth, more brood, more bees, and then more honey.

    • I also check to make certain that there are sufficient honey stores in all my colonies to feed the colony’s adult bees, and that they in turn are well fed so that they may feed the developing larvae. I am not concerned that there are large stores of honey, just enough for the next couple of weeks, as this check is done after the spring honey flow has begun, and the foraging bees are bringing in a constant supply of nectar and pollen. I just wish to ensure that the colonies have sufficient stored honey, and nectar, as well as pollen, to survive & grow in case of poor weather (when bees cannot fly) or when short periods of lack of rainfall might temporarily reduce local natural food sources.
    • As well as honey stores, some of which may be left over honey stores from the winter – especially in the top brood box, I am paying attention to fresh nectar being brought into my colonies, as well as pollen – both stored & fresh pollen. A beekeeper can tell the difference in the age of pollen by the bright colors of fresh pollen. Typically pollen is abundant, but if it is not I will feed artificial pollen made into patties. I also feed pollen to nucs that I make up, or captured swarms.
    • I am also looking for any signs that are unusual, and may be indicative of disease, such as brood that does not look normal, or bees that exhibit unusual characteristic, such as deformed wings (which may indicate the presence of deformed wing virus – and a high mite infestation. Also hive strength is a factor, are the hives growing.
    • Throughout the year, starting in spring on every hive visit, I remove mature drone brood (and sometimes worker brood & larvae) to confirm that I am not seeing an increase in varroa numbers in my colonies. I do these constant varroa checks as well as systematic alcohol washes in the spring to monitor varroa numbers. In addition to monitoring, I conducted a mid-winter (early January) application of Apivar to control varroa numbers but I continue to do constant surveillance of brood for varroa until I re-check colonies with alcohol washes after pulling honey in July.  

    As the spring progresses, and prior to the adding of honey supers to my hives, I conduct “spot checks” on my colonies about every week to ten days, to ensure that all continues to be well. On these checks I am looking to ensure that in my colonies:

    • The queen is still present in all my hives and laying eggs. I do not worry about seeing the queen but want to see increasing numbers of brood frames with eggs, developing larvae, and capped brood. That tells me that the queen is present & laying eggs, and that the colonies are growing. As spring progresses, I expect to see several frames of eggs and more frames of developing capped brood. At some point as many as five or more frames of capped brood, at which time I will make nucs to decrease the likelihood of swarming in my colonies. (In mid-March after queens were available for purchase - reared in states further south, I made nucs from my overwintered colonies.) 
    • As spring progresses I keep an eye on the number of frames of stored honey in my colonies. By late March having enough honey in my brood boxes is typically not a problem, as the nectar flow is well under way. But I am always concerned that I have sufficient empty frames of brood comb for the colony to rear brood in and raise new bees. My management goal is to balance some honey storage in the brood boxes (enough) with ample brood production. I will always add a frame (or two) of honey in each nuc I make and will move frames of honey from one colony to another to balance store honey storage in colonies. I will also sometimes move frames of capped brood between colonies to help slow down swarming urges of colonies, and balance brood. Spring is a tightrope of my beekeeping management of having strong colonies (LOTS of bees for honey production) against allowing the uncontrolled growth of colonies urge to swarm. My goal is STRONG colonies, maximum honey production, and ideally NO swarming. But I watch the trees every day for swarms. And keep an empty hive or two in my bee yard in which to place a swarm.
    • I also take note of pollen storage, but by April this is also normally not a problem. But I do make and add protein patties (made of artificial pollen substitute and sugar syrup) to new nucs. This is to ensure that young nurse bees have sufficient nutrition means to produce brood food, and royal jelly for developing queens.

    • I will take note of how many frames in my brood boxes (I use 2 deep brood boxes, each with 10 frames) that the bees utilize for honey and brood production. This is my guide for adding honey supers - when the bees are using about 7 to 8 frames – meaning colonies with brood or nectar/honey - in each brood box, I add a queen excluder, along with two to three boxes of drawn honey comb (which I have stored from last year) to each overwintered colony.

    • Starting about a week to 10 days after initial supering of hives, and then throughout the nectar flow, I will check the top honey super in each hive. If that top box is empty, or nearly empty of bees, I just replace the lid on the hive. If there are lots of bees in the top honey super, I add another. Experience has taught me that there is no need to check under that top honey super. I know it is either full of honey, or is close (lots of fresh nectar, and often honey being capped) it is time to add another honey super.

    Once I have two full honey supers on each colony, my hive management is checking honey supers to determine if I need to add more. I normally do not remove honey supers to check brood boxes below until after I pull honey I late June through mid-July. The dates mainly depends on rainfall, drought, and the continuation of the nectar flow. In my home area, most years we enter a mid-summer drought, which ends the nectar flow, and when I pull honey. This time of year much of my time is with management and creating new nucs, and queens for these new nucs.


  • Fri, March 31, 2023 5:07 PM | Phillip Craft (Administrator)

    Yes, hive bodies get heavy, especially when they are full, or mostly full, of honey. And at times, even brood boxes will contain a lot of honey, such as in the spring after a mild winter. Beekeepers have three sizes of boxes, the most common being deep hive bodies (which are 9 - 5/8” in height), and shallows – most often used as honey supers (these are 5 – 11/16”) in height, but also medium supers – also most commonly used as honey supers (6 – 5/8” in height). All these boxes are also designed to hold 10 frames, but sometimes beekeepers will reduce the number of frames used, which reduces the weight slightly. Now to the heavy, the weight of these boxes when full of honey. A full deep will weigh around 80 pounds or more, which is a “very” heavy load to lift, for anyone. Even a shallow super when full of honey weighs about 40 pounds, and a medium 50 pounds. But for those who are not serious weightlifters, and especially for those of smaller stature, including women beekeepers, and older beekeepers, the weight of the boxes MAY be an issue. And somewhere in time I became one of those older beekeepers, though I can still lift an 80-pound box, but every year it gets harder, Years ago my friend the late Carol Mark, who was an Eastern Apicultural Society Master beekeeper from the Owensboro area, and small woman, but very smart (a retired engineer). Carol and I were once discussing the lifting of bee boxes, and she told me that she had no problem with even the heaviest boxes, it was just a matter of how to do it. Because Carol had a method of lifting them off, and it did not depend on her having a lot of muscle power.

    In my hives I mostly always use two 10 - frame deeps as brood boxes, since my goal is to produce honey, and this configuration results in maximum frame surface area for producing brood and gives me the maximum number of bees in my hives in late spring. And still only requires a total of 20 brood frames. Hives are like factories, the more workers we have, the more honey the hive will produce. This spring when I started my first through hive checks, where I wished to look carefully at each brood frame, the top brood boxes were pretty heavy since it had been a mild winter, and my colonies each had several frames of honey remaining in them – mostly in the top boxes. This made for some heavy deeps to be lifted off so I could inspect the frames in the bottom boxes. I really was not enthusiastic about lifting even 60-pound deeps due to my back giving me problems, so I employed Carol’s method of lifting the deeps.

    My first task was to retrieve a couple of extra deep brood boxes from my “bee building” (beekeeping storage building). I really just needed one deep box, but I used the second just to get things off the ground a bit more, my back also doesn’t like a lot of bending over.


    I then proceed to remove and examine the frames in the top brood box, as I described in my forum post “ What I look for on the frames when checking my hive.“ I start with the end frame, look at it, then (and this is where I begin Carol Mark’s method for lifting heavy hive bodies) I place this frame into the empty deep box sitting next to the hive.

    I next check the 2nd, frame in top deep- the 3rd, 4th, and 5th frame, and after examining these frames I place them into the what was an empty deep box next to the 1st frame removed.

    I have now removed half of the frames in the top box and have about 30 pounds in each deep box - including the original top box with 5 frames, and the extra box with 5 frames.  I then check the rest of this now empty top box, replacing them back into the original box as I proceed. And then set this half empty top box over the half empty box into which I had placed the other frames. (Sorry no photos here.) I then check each frame in the bottom box, starting with the end frame, which I place on the ground to make more room to remove the rest of the frames  - one by one. These frames in the bottom box are put back in the bottom box as I proceed, again as I described in the Forum Post  “ What I look for on the frames when checking my hive.“ If the bottom box is empty, as it may be this time of year, I can set it off onto the ground, clean the bottom board, and set the half empty top box onto the bottom board. Followed by the other 5 frames from the extra deep. Then set what had been the hive's bottom box, on top of the former top box - which is now the new bottom box. I have now reversed the hive bodies – without lifting what had been the heavy 80 pound top deep brood box.

    I know that some will advocate using 8 frame equipment, which are smaller boxes, designed to only hold 8 frames. But if you have a 80 pound box, the beekeeper reduces the weight by about 20%, (2 frames/10 frames) x 80 pounds which equals 16 pounds, 80 pounds – 16 pounds equals 64 pounds, which is fine if lifting 64 pounds works for you. It does not work for me; I would much rather lift 40 pounds twice, versus a 8 frame 64 - pound 8 frame deep. Or even 50 pound mediums. That 80-pound box can also be reduced even further, as much as is needed, by just removing even more frames. This was Carol’s method. Try it out.


  • Sat, March 18, 2023 2:26 PM | Phillip Craft (Administrator)

    If you have more than one or two colonies, it is important to maintain a record of your hives, and what you find inside them on your visits. In the spring our hives will grow, increase the amount of brood in them, their honey bee population, along with such activities like the start of swarm preparation, as well as increased nectar collection. We need a record of the past status of the hive to be aware of the growth and change of what is happening in the hive within the colony. There are many ways to do this, including keeping records on your computer, or cell phone, but I have a fairly simple written system that I employ, which I will share with you. This system works well for me.


    I use a 3 ring notebook, exactly like I used many years ago in school, along with page dividers, which are labeled with the number of my hives – 1, 2, 3, etc. Each page divider represents & holds the record sheets for a different hive. Then I have a simple form, with headings of information that I collect & record each time I look in my hives. Information – as you can see below, includes the hive number, the date that I checked the hive, a line  for information about the queen in the hive, information about each brood box, honey supers on the hive, as well as a place for ‘other information’ and what else ‘needs to be done in the hive’ at a later date. I have a blank form on my computer, which I print out, retaining copies of the blank form with punched holes to be placed in the notebook, under the hive number for each hive. Below is a copy of that record form, with notes in red about what I record on the forms each time I look in that hive.

     I often make up abbreviations. For instance, if I did not see the queen – which is often, I will write “DNS” which means I “did not see" her today. If I only looked in the top box, I might write “did not look” or “DNL” out from bottom box. The important thing is to make some sort of note recording what I saw when I looked into a hive. Leaving that sheet with notes in the notebook, under the divider for that hive number. Then the next time I look in that hive, I look at the hive record sheet and the notes I made that last time I was in that hive, just before rechecking the hive. The new sheet goes on top of the one from the last visit. This way I can tell what has changed in the hive since the last visit. I do not depend on my memory, but on my written notes. What I write down depends on the season, and what is going on in my hives during that season. Right now (in March) the emphasis is growth of brood in the hive. April it may be concerns about possible swarming. And later honey supers. If you only have one hive you might remember from one visit to another, but not if you have 5, or 10, or more. You need notes.

    I am only talking about one system, the system that I use.  These forms originated from a similar record keeping system employed by a Jefferson County beekeeper, and the late Owl Landon. I have know beekeepers that use a bound record book, others a system similar to mine - but with only blank pages that they make notes in as needed at the end of each visit. One person I know used blank sheets for each hive that he placed in a Ziplock bag, and placed on top of the empty cover. The main point is to maintain the records.  

    Below are some examples of what one might see in my “Bee Book”. But adapt, make up your own system of notation. And here is a blank form, but you can use this as a model, and make up your own form. Overlook my chicken scratch, some days I cannot read my own writing, I hope that you can.


  • Sun, March 12, 2023 11:52 AM | Phillip Craft (Administrator)

    Saturday while speaking with Kentucky beekeepers at the Bluegrass Beekeeping  School I mentioned one of the earliest spring nectar plants here was Purple Dead Nettle, and the plant Henbit. These are small herbaceous plants, henbit (Lamium amplexicaule) and purple deadnettle (Lamium purpureum), both in the mint family which grow in large patches in fields. (Notice the square stems of these plants, all mints have square stems.) Bee work them heavily, and before beekeepers place honey supers on their hives. They are considered “built up plants”, honey bee colonies collect the nectar and pollen to begin large scale brood production in our hives in the early spring. It’s blooming is a signal to me that the spring bee & honey season has begun in earnest.

     I mentioned to the beekeepers that this bloom was yet to begin, but would soon. Well, as I neared home on my return drive I saw that the distinctive purple blooms of this low lying plant. The bloom had indeed begun. Watch for the purple pollen being brought into your hives this week. Click here to see a handout from the University of Kentucky. The two plants are very similar, but their leaves differ in shape. The plants are   considered weeds, note the words ". . . and control" in the handouts, but not to beekeepers. I think Purple Dead Nettle may be more prominent here. In the spring I first notice the plant’s bloom as a flash of purple in roadside & in my yard, which is more weed than grass. Later what will become hay fields in my home area will become a vast sea of purple. But the bees get the first crop in the hay fields. I think most non-beekeepers hardly notice these little purple flowers, but I most certainly do. I know I have photos that I had taken of Purple Dead nettle in bloom, but I cannot find them, my filing system needs work. Hopefully tomorrow it will be more sunny, cloudy & wet out today, and I will get my camera and post some photos. But for now, see the photos in the U.K. flyer, and check back later.


  • Mon, March 06, 2023 11:42 AM | Phillip Craft (Administrator)

    Recently I wrote about my “First look of the new year into my hives” (February 13, 2023 Post), a check that I had performed a couple of days earlier. But on that visit, which is typical of my early looks in my hives of the year, I did not remove any frames, and look at them. I merely observed the honey bee cluster between the frames, after removing the lids. That gave me all the information that I needed at the time – that told me that the bees in the colony had survived the winter, and the size (number of bees) of the hive’s cluster. Now that we have had a period of warm weather it is time to remove frames and to take a closer look in our hives.

    You may wish to review my earlier posts on reversing hive bodies and lighting your smoker – if you have difficulties either lighting your smoker, or keeping your smoker lit.

    Why didn’t I remove frames in the earlier visit? It was barely in the 60sF, and a quick look at the opened hive’s cluster told me what I wanted to know in my first check. The fact that the colony was alive, and its cluster size. And this early check was also done while inserting Apivar strips (for varroa control) as early as January, and while replenishing sugar patties. (Just in case emergency winter feeding.) In this post I will describe what to look for in the hive when removing and examining frames.

    What I do & look for?

    In this visit I will look at all the frames in the brood boxes, though I expect at least some of the bottom boxes will be empty. And on those hives, I will reverse the hive bodies (see my March 1 post on reversing hive bodies). First – as I do when opening the hive when planning to remove the hive’s top box in the visit, I will first remove the outer cover and lay it on the ground with the top of the cover flat on the ground – upside down. And I will then remove the inner cover (smoking the bees as I pry up each lid), and removing the inner cover, I will lean it against the end of the hive just to keep it out of my way. And after removing the inner cover I will puff some smoke between the top of the frames. An old beekeeper I once know described this smoke as “telling the bees that I am coming”. Now I am ready to look in the top brood box.

     Photo by Mary Carney

    I will then start at one end of the brood box, and remove the end frame, though this time of year it will likely be empty – meaning the drawn comb will have nothing in it. I will remove this frame & set it on the ground out of my way. Removing this end frame is very important, as it gives me an empty space on this end of the brood box, so I can loosen & pull the next frame partly back into the empty space where I removed the first frame, then lift this frame out to examine it. Later in the year that first frame will not be empty, it will likely be full of honey, and I would again set it on the ground to give me that empty space. (More in a later post on why that end frame is likely full of honey.)

    If the second frame is empty (which is possible this time of year), I will pull it back in the slot previously occupied by the first frame – again leaving me with an empty 2 frame space in which to pull back the next frame. I will repeat this removing a frame & then setting it back in the box, then pulling it back as I go through the box. I will now continue through the hive until I find a frame covered with bees – will likely first encountering a frame only covered with bees, or honey. As I examine each frame I will note how many frames are only covered in bees, or full of larvae or capped brood, or eggs, or pollen, and frames filled with honey.  I will then record this information of what were in the frames in my Bee Book (my hives record book). Recording this information is very important to me, as it gives me a record of the condition of the hive for me after this visit, and before looking at the hive again. And this tells me what is going on in the hive. Is the queen laying eggs and is the colony raising larvae & brood. I always look at the notes for the previous visit before looking at it on the next visit, so I am aware of the changes in the hive.


    Notice that I did not mention that I was looking for the queen. This is not necessary, since if I saw eggs, or larvae, or even capped brood, I know that she was there recently. Though if I see her, I note that in my records. But seeing “signs” of her is good enough. On a later visit if I see her, I will mark her. More on that in later post as well. I will teach you a simple & safe method for marking your queens. If I do not see “signs of her” I will look more closely for her.

    Before closing the hive (remember I have been describing looking in the top box), I will pry up the top box, lift it off the hive, and set it down at an angle onto the lid I left sitting on the ground when I removed it. (At an angle as to prevent squashing any bees on the bottom of the box.) Early in the spring all or most of the bees will be entirely in the top box. I say normally, as with honey bees & beekeeping there are always exceptions. If this bottom box is empty of bees – I will temporarily remove the box, and move what had been the top box onto bottom board , then set it back on the hive stand). I will then sit the empty bottom brood box on top of what had been the top box. I have now reversed the hive bodies. If the bottom box contains bees and brood – which means the colony has already begun moving into the bottom box on their own, I will not reverse the hive bodies, but I will look through this box, as I did the top box.

    You have now completed your inspection of your hive. I always perform hive checks looking for the same things, and I make note of the in my Hive Record Book:

    • Frames covered with bees.
    • Frames of brood, including frames of larvae & capped brood, and frames containing eggs.
    • Frames of honey, capped honey, or fresh nectar being brought into the hive.
    • Frames of pollen (I will also note if the bees are carrying into the hives fresh pollen on their legs.

    Though on some later visits, depending on the time of year, I may be concentrating on certain thigs, like frames of brood or frames of honey. More about that in future posts.

  • Wed, March 01, 2023 11:38 AM | Phillip Craft (Administrator)

    Reverse brood boxes, or not? I think this management hive manipulation falls in the optional category, but as often happens not all beekeepers will agree with me, or not all beekeepers agree on the importance of conducting this reversal. This maneuver assumes that bees will more quickly go up in the hive to empty comb, versus down into empty comb.

    Seasonal movement between boxes with the hive
    The most common configuration for a honey bee hive consists of two brood boxes on the bottom of the hive, with honey supers placed above after the honey flow begins. After honey supers are removed in late summer, the bees and brood will be fairly equally distributed within the two brood boxes. In the fall with the onset of the fall nectar flow (asters & goldenrod) we will see more honey packed into the top brood box in preparation for winter, with a majority of the brood in the bottom box, along with some food stores. During winter the bees in the bottom box will consume the honey stores in the lower box, brood in that box will emerge, and the bees will then move up into the upper box, where most of the honey stores are now contained. We then find that in the early spring most of the bees, along with early eggs & brood, some stored pollen and remaining honey stores, are in the top box of the hive. And typically, the bottom box is empty.

    What happens later in the spring?
    The bees will need to move back down into the lower box, to utilize the empty comb in those frames to rear brood, and to begin storing new honey & pollen to feed the larvae as part of this spring increase of the bee population. The question remains: Will they move down on their own? There is no doubt they will. Last week I did a quick check in some of my hives, and in one found that the bees had already begun to move down into the lower box, and were rearing brood in that box. Below is a photograph of one of those frames. Note the bees & brood in the top half of the comb in the frame.

    When I find that the bees have begun movement into the lower box on their own, I leave the lower box on the bottom, especially if they have begun rearing brood in that box. And I do NOT reverse the hive bodies. Why? Note the location of the bees & brood on this frame. They are in the top part of the frame. If I placed this and similar frames on top of what had been the upper box, there will be a gap of bees between this area of brood, and the bees in the box below. This is a possibility of dividing the hive’s cluster and might on cold nights allow the brood in this area to become damaged. By not reversing the hive bodies in this situation, I remove this possible damage.

    Another reason I do like to reverse the hive bodies is because it leaves the lighter box on the top of the hive, and as spring progresses is easier on my back to set off this box to look into the box below. Versus each time lifting off the heavier box that formerly was in the top position.

    So how do I go about reversing the hive bodies? Much as I begin any examination of a hive, I start with removing the outer & inner covers, and place the outer cover on the ground upside down. I lean the inner cover against the hive – I am just getting the outer cover out of the way.

    By looking between the top box frames, I observe the top box is full of bees, or if I learn this by removing frames, and checking the top box further. I will then smoke the bees and insert my hive tool between the two hive bodies to break the seal between the boxes. The bees will have sealed this gap very tightly during the winter. After breaking the seal between the boxes, I then remove the top box, and place it “catty-cornered” upon the upside down lid (to prevent smashing of bees), which is the practice I always follow when setting a hive body with bees onto the ground.

    I then check the bottom box. If the box appears to be empty of bees, I will remove this lower box as well, placing it on the ground. If there is debris on the bottom board, I will scrap it clean. I will then place the full (what at been) top box onto the bottom board, and then place the empty (what had been the bottom) box onto the now lower box. Replace the cover. I have now reversed the hive bodies of the hive. I return the covers to my hive, put the brick back on and I am done.


  • Thu, February 23, 2023 11:37 AM | Phillip Craft (Administrator)

    On advising beekeepers to look into their hives, I always say, “First, light your smoker.” I often hear – even from people who have had bees for a year or more – “I always have trouble with that” or, “I can’t keep it lit.” Then we have a smoker lesson. This post will be a smoker lesson.
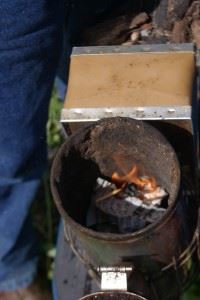
    First step: lighting the smoker. Start by lighting the smoker when it is empty, or almost empty; do not try to light one full of fuel. I wad up a piece of newspaper (about one forth of a double page sheet) or any scrap paper, place it in the bottom of the smoker, and use a large kitchen match, or lighter to light the paper. Though a match you can drop into the smoker. Then I place another, similar size piece of paper on top of the lit one. The hive tool is handy for moving lit materials around inside the smoker. Next, I add my starter fuel – in my case, wood chips. – as in pet bedding I sprinkle a handful on top of the lit paper. (If you just dump them in, the flaming paper may go out.) I wait a bit, to let the wood chips ignite, then add more, once again sprinkling them on. There are several fuels which can be used as alternatives to wood chips: small pieces of burlap (about 5″x 5″ works well), dried grass clippings, pine needles, or even leaves. Any natural material which ignites quickly will work. When using some of these fuels, like burlap, you can skip the paper stage and just light the burlap.
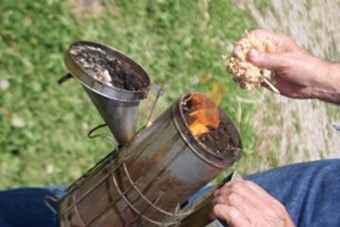
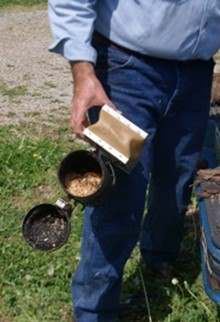
    As the materials catch, I pump the bellows to give the fire air. I then SLOWLY add more fuel, let it ignite, and pump the bellows until the smoker is about 1/2 to 2/3 full of burning fuel.  As I said, there are a number of good fuel choices but, for starting the smoker, you want something which will ignite quickly. I pump the bellows until fire comes out of the top of the smoker. The smoker is now lit. The next challenge is to keep it going.

    Next step: topping off the smoker. At this point, I like to add broken up pieces of bark – personal choice.  I add the bark a little at a time and pump the bellows as I put pieces into the smoker until it is almost full.
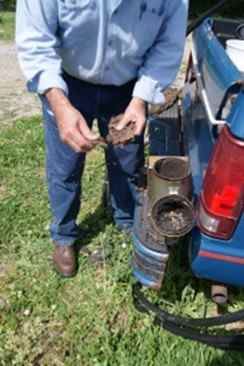
    In addition to its availability, I like bark because, though it takes it a while to catch fire, it will burn for hours once it does. I just need to pump the bellows every once in a while. Once I have it lit in this manner, I can leave my smoker sitting for half an hour or longer, then just pump the bellows to get it going again. I’ve used other long burning fuels as well, such as walnut shells, sumac seed pods, and small pieces of wood. As an alternative to any of the above, finer materials such as wood chips or burlap, loosely packed in the smoker until it is almost full, will stay lit long enough to check a few hives. Just do not pack it tightly, and remember to pump the smoker as you add the additional fuel.

    Once the smoker is well lit and loaded with fuel, I close the lid. When I pump the bellows gently, I can see smoke drifting out of the spout. You do NOT want fire to come out of the spout while you’re using the smoker on your hives. If the top 1/3 is full of loosely packed fuel, you should see nothing but cool smoke.

    Using the smoker: When I first approach the hive, I gently puff smoke from one side of the hive entrance to the other, just to let them know I’m on my way in.
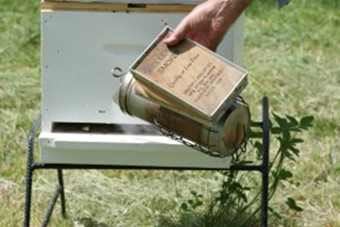
    Then, I remove the outer and inner covers and, on the “up wind” side of the hive top, pump the bellows and let smoke drift across the frames. Usually, I don’t point the spout directly into the hive, but let the air currents move the smoke across it. However, if there is no wind, I angle the smoker down and move it over the top of the hive while pumping the bellows gently and directing the smoke into the frames as shown in the pictures above and below. If the smoker is well lit, it doesn’t take a lot of pumping to smoke the hive.
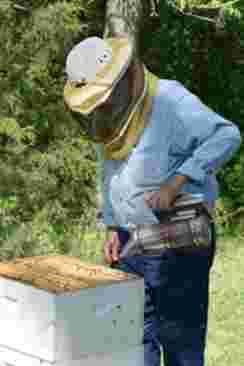
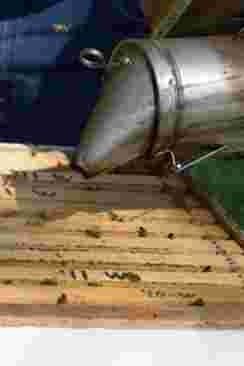
    I find that, often, the only time I need to smoke a hive is when I first open it. If the bees fly at my veil or if I receive what I consider to be unprovoked stings, I’ll smoke them again as often as needed. But as long as they remain calm, once is enough. You might wonder, if so little smoke is needed, why smoke them at all or even light the smoker? It has been my experience that, if I do not initially smoke the hive, the bees will react at some time during my visit. If the smoker isn’t ready and I decide that I need it at some point, I have to stop what I’m doing to light it. I recomend smoking the bees when you first open the hive, then proceeding based on how they react.

    Review: Lighting a smoker is as much an art as a science. Every experienced beekeeper has his or her own methods, tricks, and favorite fuels. I’ve just shared mine, and you will develop your own. Just remember the basic steps: start your smoker with a small fire, add natural fuel a little at at time, and pump the bellows as you get the fire going. Once it is burning well, with lots of smoke and fire coming out the top, top it off with more fuel. Take your time. I occasionally have trouble keeping my smoker lit too, but it is always because I hurried to light it and did not get it lit WELL.

    Many or most beginning beekeepers “suit up”, meaning that they wear so much protective clothing that they can’t be stung (or think they can’t.) Why smoke the bees, then, if you’re already protected? If you don’t smoke the hive, the bees will likely become agitated at some point, flying at your veil (popping your veil as we say), making your time with them less pleasant than if you had used smoke. In addition, they can sting through most coveralls and gloves, though you may not feel the stings as much. (There are truly sting proof coveralls available, but they become very hot as the weather gets warmer). Also, agitated bees may sting pets or, if you have a small yard, neighbors. So light your smoker and use it. It is a good beekeeper’s tool.

    Photos by Mary Carney.


  • Sat, February 18, 2023 11:14 AM | Phillip Craft (Administrator)

    I have known Kent Williams for over 25 years. I recall our first meeting, though I can’t remember exactly where I met Kent. At a KSBA beekeeping meeting - somewhere in Kentucky. Likely at a University of Kentucky county extension office in a rural Kentucky county where the meeting was being held.  I have memories of Kent and I standing outside discussing Buckfast queens. I recently ran across this YouTube video of Kent discussing his beekeeping operation and teaching other beekeepers in his beekeeping school. Kent is joined in the video by several other beekeepers from Western Kentucky & elsewhere in this vide. Kent looks much the same as when I first met him all those years ago, big & burly, though like myself greyer, especially the hair on hie face. Kent maintains several hundred hives in Western, Kentucky and Mississippi, he also send hives to California each year to pollinate almonds.

    Kent operates his hives in Kentucky and Mississippi, is a EAS (Eastern Apicultural Society) Master Beekeeper, and sends hives to California to pollinate almonds most years. Each spring he, and his family host the Kent Williams Beekeeping School on his farm in Wingo, Kentucky. This year this event will be held from April 20 - 22nd. For more information go to the Lake Barkley Beekeepers Facebook page at https://www.facebook.com/events/3362410497305768/?ref=newsfeed, or you can call Chuck Williams at The Bee Barn, in Paducah, Kentucky - (270) 519-4772 for more information. Film of last year’s school is shown in the video. The school is hands on, meaning you get to work in hives, is free, but donations to cover food is welcome. I have been told that the food is excellent. Maybe Western Kentucky barbeque?  I plan to travel to Wingo for this years school.

    I think you will enjoy this video about Kent. so watch & listen to Kent talk about his beekeeping journey. This YouTube video was created by Eric Manning


  • Tue, February 14, 2023 6:00 PM | Phillip Craft (Administrator)

    It is not quite spring yet, but it is warm out there - in the 60s°F today & likely into the 70s tomorrow at my house south of Lexington. I suspect hive lids are coming off all over Kentucky this week. While we need to be careful about opening our hives this time of year, one advantage of living in the upper south is that we normally get some warmer days throughout the winter. The beekeeping books, and as I advise beekeepers, say don’t open hives unless it is above 50°F, and better if above 60°F.  And I also say better if a sunny days, without a cold wind blowing. Though there is not a problem with taking the lids off hives if a little below 50 (if it is not raining) to quickly do such tasks as removing miticide strips, or inserting sugar patties. In fact I did just this with my hives on such a day in early January (I think it was right around 50°F that day) to insert Apivar strips (for varroa mite control) and to place sugar patties into my colonies.  This hive opening also served as an early inspection, though I did not pull any frames out. Just by removing the outer & inner cover I learned that the bees were alive and had survived the winter up to that point. What I learned:

    • The size of the cluster, some almost filled the top box, others had at least covered about 6 frames – okay for early January. 
    • Lifting (hefting) the entire hive from the rear tell me that that all were fairly heavy, though I still added winter sugar patties (which I purchased from a local bee supply store, though you can make your own, or even put loose table sugar on top of the inner cover.) I consider the patties insurance – “just in case they need the feed”). I do not worry about them going hungry.

    Since that day, I have been re-checking the sugar patties every two to three weeks. This also again gives me the opportunity to observe the cluster. I had one hive, a nuc that I purchase last June, that wintered fine in only one deep box. When I checked the patties in that hive a few days ago the bees pretty much filled the box, so I added another deep box with drawn comb that I had. I will see if they are doing anything in that new box in a few days.

    Note the bees covering the frames - the "cluster", also there are some paper shreds from the winter patty that I placed on the hive. I have since added a second deep to this colony.

    In a future post I will talk about what to look for when we remove frames from the brood boxes & inspect them.


  • Fri, February 03, 2023 7:00 PM | Phillip Craft (Administrator)

    From Phil Craft to beekeepers

    I have a long history of communicating with beekeepers. For many years I have been invited to speak at beekeepers’ meetings from my local Bluegrass Beekeepers Association meetings (in Lexington), throughout Kentucky, and nationally. While serving Kentucky’s beekeepers as the State Apiarist (1999 through 2011) I spent a lot of time on the telephone and in emails answering questions & providing information to beekeepers, in addition to helping in-person while attending the many beekeeping meetings. For many years I wrote a monthly beekeeping newsletter titled ‘The Buzz’ that was produced and distributed by the Kentucky Department of Agriculture. After retiring from the KDA, I created (with a lot of help from my friend Barry Richards) a personal beekeeping webpage, PhilCraftHiveCraft.com. In addition to the evolving educational content on that webpage, I invited email questions & offered public and private responses to them. From 2013 through the spring of 2018, I penned a Question-and-Answer column in Bee Culture magazine, “Ask Phil”. Many of the columns are still available out in hyperspace. If you use a search engine like Google you can find them; just search ‘Ask Phil, Bee Culture magazine’, and you can even add a specific beekeeping subject in your search.

    In more recent years I have served as a consultant for Veto-pharma, a French beekeeping pharmacological company best known for Apivar, serving as their North America technical adviser. This position extended my travels throughout North America and into Europe, where I visited beekeepers and attended and spoke at state and national meetings, and answered  international questions from beekeepers.

    In early 2022, while continuing to work for Veto-pharma mostly from home, I made the decision to pretty much stop traveling for work, and work more at being retired - but not completely, I still work from home a few hours a week for Veto-pharma. I wanted to stay home, and not travel, where I could spend more time with my bees and my family. Being at home with more leisure time allowed me to become more involved with my local beekeeping group, as well as the Kentucky State Beekeepers Association, where I took on the role of KSBA Education Coordinator. This position allows me to provide educational opportunities for Kentucky beekeepers, including recruiting speakers for state meetings and conducting online beekeeping classes, which have been recorded and can be found on the KSBA website.

    This history leads us to this online KSBA webpage forum. Here I will continue this communication with beekeepers, discussing beekeeping and honeybee topics as well as answering questions via email. I may even wander away from honeybees from time to time. Many beekeepers are also interested in other insects - “bugs” - as am I. I have also collected a large number of interesting photographs throughout my travels that I would be happy to share with you as well.

    If you have a beekeeping question feel free to email me and I will email you back an answer.

    So come back. In the next post I will talk about honey bees & beekeeping.

    Phil Craft

Powered by Wild Apricot Membership Software